You’ve probably heard of the saying, “If you’re not assessing, you’re guessing.”
Fitness assessments are like pre-purchase car inspections. They are not mandatory, but doing them can save you time, energy, and frustration later.
Taking the time to perform a fitness assessment before offering your personal training services is necessary for learning more about your client, their limitations, and how to best approach them.
Likewise, a proper first assessment benefits your client because you can provide better training recommendations.
In simple terms, it’s a win-win situation.
But what exactly is a fitness assessment, and how can you perform one if you’ve never done it before?
Stick around to find out.
What is a Personal Trainer Assessment?
A personal trainer or fitness assessment is the process by which a trainer or coach measures a client’s physical fitness level. Every fitness professional needs to perform it to gain a deeper understanding of their client, their limitations, and their abilities.
Not performing an initial assessment is bad for you and your client. You’re not establishing a starting point, which makes it more challenging to monitor the person onward. For instance, how would you know if your client’s posture has improved or they’ve gotten stronger if you don’t know their starting point?
In case you think you can remember that information for every client, let us save you the trouble: You can’t.
You can sort of remember a client’s starting point, but it would be far from accurate, and it will become increasingly impossible as your client roster grows. This is particularly true if you manage a whole sports team.
An initial assessment is a good starting point, but competent trainers perform these consistently to monitor their clients and track progress. As a rule, you should perform fitness assessments every four to eight weeks, depending on the client.
A simple way to understand the importance of an assessment is to imagine that you’re trying to lose weight without tracking your body weight. Sure, you can probably tell if you’re making some progress, but you would be far from specific and wouldn’t know if your diet and exercise plan work as intended.
Types of Personal Trainer Assessment Forms
There are two primary types of assessment information you can get from clients as a trainer or coach:
- Physical fitness assessment
- Health and lifestyle assessment
The first type is the one you should focus on because it will have the most significant impact on the coaching process and what decisions you make along the way.
It includes body fat percentage, circumference measurements (e.g., the thighs, arms, and chest), postural analysis, physical tests, and movement screening.
The second way to perform assessments is to examine your client’s lifestyle and overall health. This is also beneficial and can give you valuable information on how to best serve each client.
It can include information like:
- Overall health and medical conditions
- Smoking and alcohol habits
- Sleep quality and length
- Lifestyle stress
Getting more information can be valuable for understanding your client and their needs. For example, if a client only sleeps five hours per night (health and lifestyle assessment), you would know to temporarily reduce their training volume and intensity to prevent burnout and overtraining.
Related article: Personal Trainer Questionnaire: Why and How (+Example Questions)
The 3 Essential Components of a Personal Trainer Assessment
1. Personal Information
Every fitness assessment starts by recording some basic information:
- Name
- Date of birth
- Gender
- Height
- Weight
- Date (of assessment)
- Assessment number (first, second, 10th, 20th, etc.)
- Name of the person doing the assessment (e.g., yours or that of a colleague)
2. Body Fat Percentage
The second piece of information to record during an assessment is the person’s body fat percentage.
Now, it’s worth noting that no method for measuring body fat is entirely accurate. DEXA is the most precise method, but even it can be off by one to three percent (1). Plus, it is not convenient in most cases.
The two ways to record body fat are:
- Skinfold calipers
- Bioelectrical impedance analysis (BIA) – a hand-held device or a special weight scale
To ensure accuracy, it’s best to take these measurements in the same way and at the same time of day.
You can learn more about skinfold testing in the following video:
3. Circumference Measurements
Taking basic measurements of different body parts is also necessary for tracking your client more accurately and making sure they are making progress between assessments.
Doing so is especially important when the client’s primary goal is weight loss.
You should take a tape measure of several key areas:
- Upper arms
- Chest
- Waist (three fingers above the navel)
- Waist (at navel)
- Hips (around the buttocks)
- Thighs
If a client is more interested in overall hypertrophy, you can also measure their forearms and calves.
Wrap the tape around each body part to fit snugly, but don’t tighten it to the point where it compresses fat tissue. Taking these in the same way each time will ensure greater accuracy.
Fitness Assessment: Posture, FMS, and More
You’ve signed a new personal training client and have performed the basic fitness assessment.
Now is the time to dig deeper and get the necessary information to assemble their exercise program or make adjustments if something doesn’t look right.
1. Posture
Once you’ve covered the basics, posture is the first thing to examine. Here are the primary types:
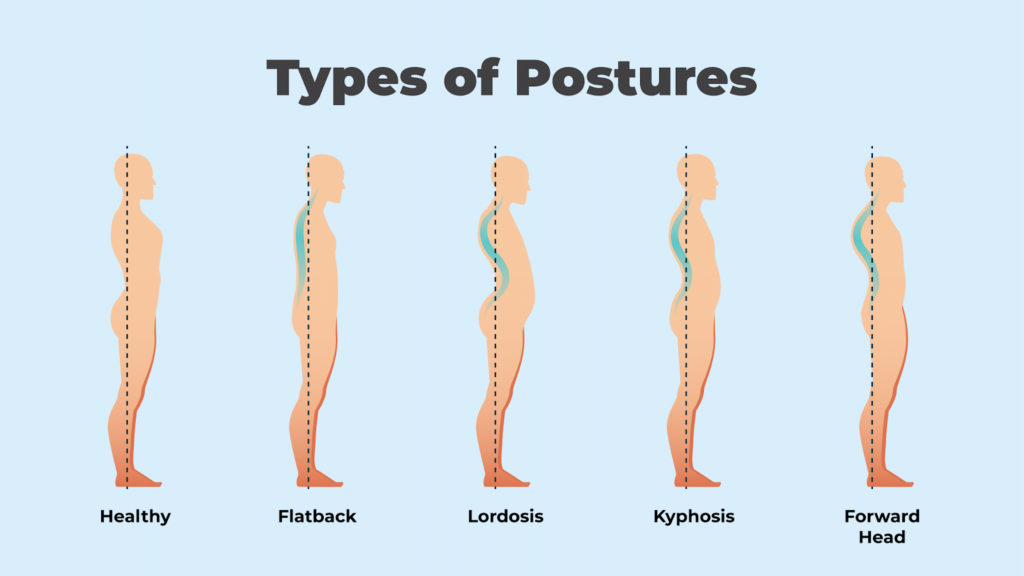
Source: https://ergomeisterofficechair.com/types-of-posture/
Kyphosis and a forward-head posture are two common types you will see in new clients. You should determine which category each client falls into because that will influence how you program their training sessions.
For example, if a client suffers from lordosis, you could incorporate more abdominal and glute exercises (2, 3).
Similarly, if they are dealing with a forward-head posture, incorporate more pulling movements to strengthen the back musculature.
While examining the client’s posture, you should also look for asymmetry, such as one side being more developed. Similarly, examine how the client stands and if they tend to lean more toward one side.
2. Functional Movement Screen (FMS)
FMS consists of seven movements:
- Deep squat
- Hurdle step
- In-line lunge
- Shoulder mobility test
- Active straight leg raise
- Trunk stability push-up
- Rotary stability
You can see a demonstration of each of these here and read more about FMS here.
Performing an FMS is necessary for further evaluating your client’s abilities and determining which weak areas you should prioritize from the start.
An alternative to FMS is simply evaluating your clients during their training and examining their range of motion and stability. Observation can be an effective way to perform a mobility and flexibility assessment.
3. Cardiovascular Fitness
Performing a cardiovascular fitness test is beneficial but optional, especially when working with older clients, folks healing from a recent injury, and those with heart-related issues.
One simple way to do a cardio test is to get your client to warm up and put them on a stationary bike, recumbent bike, or elliptical trainer for a minute.
Set moderate resistance and have them do a near-maximal effort run before writing down their caloric expenditure and distance passed.
4. Muscular Endurance and Strength (Fitness Tests)
The final portion of the fitness assessment examines your client’s muscular endurance and muscular strength.
It’s best to consult with each potential client to understand their fitness goals before doing any tests. Doing so is necessary to know how to design their exercise program.
Knowing about your client’s fitness goals is also beneficial for picking the right exercises for the movement assessment.
For example, one client might be more oriented toward general fitness and well-being, in which case a push-up test might be ideal. In contrast, a client more interested in strength development could do better with a bench press test.
Additional exercises you can use to assess the client’s muscular endurance are:
- Dead hang
- Wall sit
- Elbow plank
Ready to take your training business to the next level? Join Hevy Coach now and see the difference.
Related article: The Best Tools for a Personal Trainer: Fitness Tracking, Equipment & More
How to Create Fitness Assessments (Step-By-Step)
Here is precisely how to perform fitness assessments step-by-step.
Step 1: Initial Consultation
Before doing fitness assessments, you must first get to know the potential client and if you would be a good fit for them.
The initial consultation is simply a scheduled meeting in person or online, where you and the person sit down and have a conversation.
Here are some questions to ask during your first meeting:
- What would you like to achieve in the next three months?
- What goals would you like to reach in the next year or two?
- What are some roadblocks that could stop you from reaching your goals?
- What does a day of eating look like for you?
Step 2: The First Assessment
The first assessment differs slightly from the rest because it tends to be the longest to plan and perform with a new client.
Having the initial consultation is necessary for learning enough about your client, so you can:
- Identify their short and long-term goals
- Determine what things to include when assessing that individual client
- Choosing your assessment tools
- Creating the assessment form or tweaking an existing one
Once you’ve decided on the criteria, perform the assessment and fill out the fitness assessment form. It’s best to print it out and do it by hand while going through the session.
Step 3: Analyze the Results
Take your client’s results and compare them to the available fitness guidelines. For instance, if you’ve included the push-up test, you can compare the results based on the following:
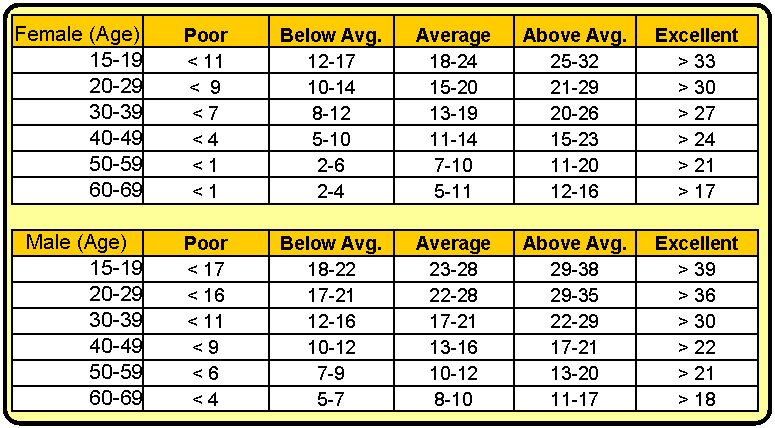
Source: https://kinesiologists.ca/wp/pt-store/free-resources/assessment-push-ups/
There aren’t guidelines for all movements, so you won’t always be able to ‘place’ your client’s performance in a category. However, that isn’t a big issue because what matters most is that you see improvements from one assessment to the next.
Improvements to look for include:
- Body composition – gaining muscle, losing fat
- Fitness test – performing better than before
- Movement tests – training through a longer range of motion, maintaining stability, etc.
You can learn more about scoring FMS here.
Step 4: Set Goals
The next step is to set concrete goals for your clients. These should align with their preferences but should also consider pressing issues the client might need to resolve.
For example, a client might want to gain as much muscle and strength as possible but might score exceptionally low on cardio tests. In such a scenario, establish some desirable goals for your client, but also help them improve their cardiovascular health.
Once you’ve done everything, assemble the exercise program that works for your client and considers their preferences, goals, schedule, available training equipment, etc.
Step 5: Perform Another Assessment Four to Eight Weeks Later
The first assessment is an excellent way for personal trainers and coaches to determine baseline measurements, but that is just the starting point.
Repeating the process every four to eight weeks is necessary for tracking progress to ensure that your client is moving in the right direction. In addition, clients often start looking forward to assessments because they are eager to see how much they’ve improved since the last time.
Assessments also provide valuable feedback in cases where clients don’t improve at an optimal rate (or at all). In such scenarios, the coach can make all the necessary changes to help the client move forward.
The good thing about every assessment after the first one is that it doesn’t take as long because you’ve already established clear rules and your client has some experience. Plus, you won’t do all of the tests––for example, you won’t take a new height measurement.
Perform the same tests, write down every data point, and compare each one to the previous one to see how your client is doing.
Do you want to give your clients the best workout experience possible? Hevy Coach can help. Check it out and take your coaching business to the next level.
Fitness Assessments Best Practices & Tips
1. Be Consistent
If you’ve ever tracked your fitness progress at home, you understand how crucial it is to consistently track variables (body composition, performance, etc.) to ensure accuracy.
The same goes for client assessments. You must develop an easily repeatable step-by-step process to better monitor your clients the same way each time.
For example, when taking circumference measurements, always wrap the tape around each body part in the same way–the same position and tightness. Inconsistency affects readings and makes it difficult to tell if your client is improving.
2. Be Thorough
Our second tip for a proper fitness assessment is to be thorough. You should examine your client’s body composition, posture, performance, and movement proficiency to ensure that each improves alongside the rest.
3. Be Flexible
Examining movement patterns and setting brief fitness challenges are effective ways to assess your clients, but nothing is mandatory. If you don’t feel comfortable performing a specific test with a client, simply don’t do it.
Find a safer way to get the data you need, or skip that portion of the assessment for now. No test is good if it puts your client at injury risk.
4. Motivate Clients
Personal trainers should encourage clients to improve and adopt fitness as part of their lifestyle. One good way to keep clients more accountable and invested is to remind them to track their progress at home.
For instance, the body weight measurement you perform during an assessment is excellent, but it can also be inaccurate because it occurs occasionally.
A better way to track that metric is to have your clients weigh themselves several times per week, preferably in the morning and on an empty stomach. They should calculate the average and compare it from week to week.
The same goes for other metrics:
- Ask clients to log each workout (such as with an app like Hevy)
- Instruct them to take circumference measurements at home every two weeks
Conclusion
Personal training assessments are crucial for keeping your clients on track and ensuring they are making progress. A thorough fitness assessment covers seven key things:
- General info (height, weight, etc.)
- Body fat percentage
- Circumference measurements
- Posture
- FMS or similar
- Cardiovascular fitness
- Muscular endurance and strength
Performing a good assessment isn’t challenging, but you must remember several things. Most notably, you should have a consultation with a potential client to ensure you would be a good fit and proceed to the assessment, going over each thing diligently.
From there, you must re-do the assessment with the client every four to eight weeks to track progress.
We’ve assembled an assessment form template for you to use or take inspiration from. Check it out here.